In today's fast-paced office environments, printers play a crucial role in ensuring seamless workflow. However, occasional maintenance is inevitable, and one common issue users may encounter is the need to replace the fuser. In this comprehensive guide, we'll walk you through the step-by-step process of replacing the fuser in your Xerox VersaLink B610 printer, as demonstrated in a helpful YouTube video from our Printing Workshop.
Read our review of the Xerox VersaLink B610.
Step 1: Open the Back Cover
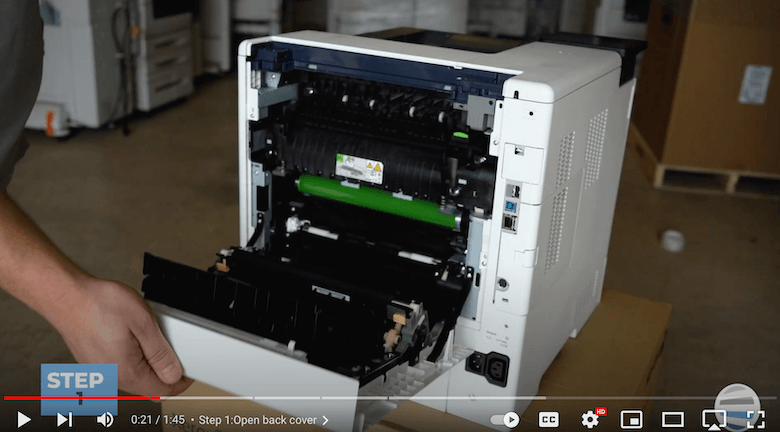
The fuser is located in the rear of the Xerox VersaLink B610 printer. To access it, open the rear cover. Keep in mind that the fuser can be extremely hot, so exercise caution before touching it.
Tip: Power off the machine first!
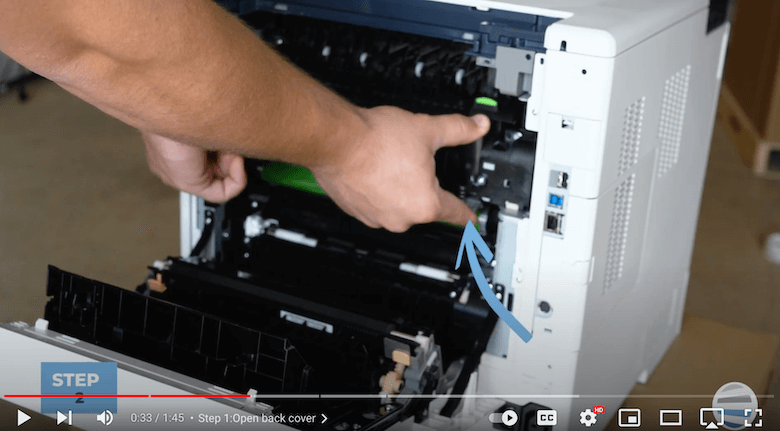
Step 2: Remove the Fuser
Once you have opened the rear cover, it's time to remove the old fuser. Using your thumbs, place them on the black thumb holes on top of the fuser. Simultaneously, squeeze the gray triggers on the bottom and pull the fuser straight out. This simple maneuver exposes the fuser for replacement.
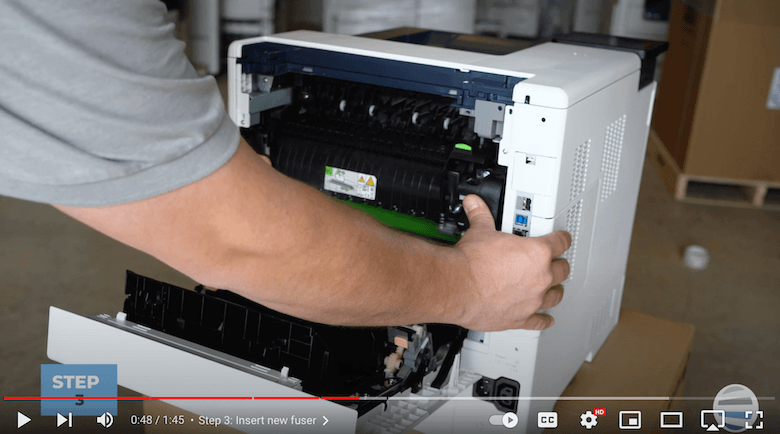
Step 3: Insert the New Fuser
Now, it's time to insert the new fuser. Lay the replacement fuser on the shelf within the machine, ensuring it's properly aligned. Use your thumbs to give it a firm push until you hear a satisfying click, indicating that it's securely in place.
Step 4: Close Rear Cover
Lastly, push the rear cover back in until it clicks in place.
Additional Notes:
Take note of the green sticker on the replaced fuser. This sticker serves as a handle to open a gate for clearing paper jams easily. It's a thoughtful design that enhances user convenience.
There is also another green sticker at the back of the printer, providing access to clear jams deep within the paper tray area. These features demonstrate the printer's user-friendly design for hassle-free maintenance.

To find out about other common printer issues, read our blog on the 9 common printer problems (solutions).
Pro Tips:
- Safety First: Always exercise caution when handling the fuser, as it can be hot. Consider wearing gloves to protect your hands.
- Handle with Care: Take advantage of the green handle sticker on the fuser for easy access to clear paper jams.
- Be Attentive: Your printer will typically let you know when supplies need attention, so watch your display for messages.
Congratulations! You've successfully replaced the fuser in your Xerox VersaLink B610 printer, thanks to the clear instructions from the Printing Workshop. As a final note, remember that regular maintenance, such as replacing the fuser, is essential for prolonging the life of your printer and maintaining optimal print quality.
Printer Maintenance is Key
In closing, a well-maintained printer is a reliable asset in any office setting. Common printer problems will inevitably happen, but knowing to tackle them will ensure that your business workflow remains steady. With this step-by-step guide, you now know how to confidently replace the fuser in your Xerox VersaLink B610 printer.
Want More Tips?
If you found this guide helpful, explore more how-to videos on the Printing Workshop's YouTube channel for further insights into maintaining your specific printer model.
If you have any further questions or want more specific information, reach out to us today to talk to one of our trained printing experts on any Xerox printer.